Cardboard Relief Printing: Creating Repeat Patterns
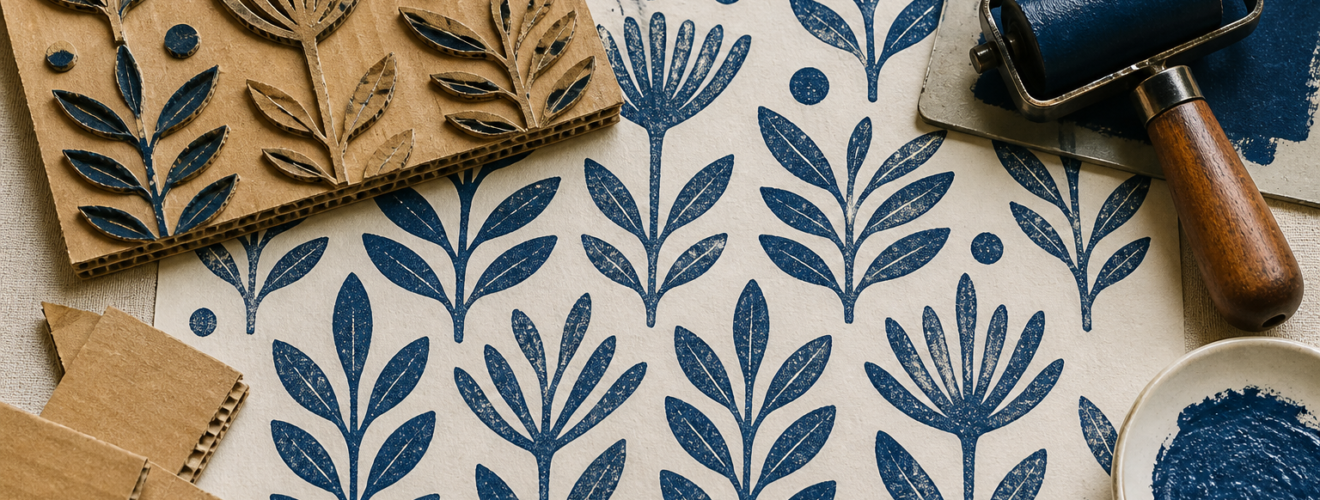
Relief printing is a vital part of the fine arts. It is a process where an artist carves into a surface. The raised parts of the surface hold the ink. The low parts do not. When the artist presses paper onto the surface, the image moves to the paper. This creates a print. Many people use wood or linoleum for this work. However, cardboard is an excellent alternative. It is easy to find and low in cost. It is also an eco-friendly choice. This article explores how to use cardboard to create repeat patterns. This method blends simple tools with complex design. It allows artists to turn waste into professional art. The goal is to master the craft of the repeat pattern through the relief process.
The Value of Cardboard as a Printing Matrix
In the world of art, the term matrix refers to the plate used to print. Cardboard serves as a unique matrix. It is not just a flat surface. It has layers. Most cardboard has a top layer, a wavy middle layer, and a bottom layer. This wavy part is called corrugation. Artists can use these layers to create depth. By peeling away the top layer, you reveal lines. These lines create a built-in texture. This is why cardboard is such a strong tool for relief work. It offers a range of visual effects that wood cannot. It also requires less physical force to cut. This makes it a great choice for students and pros alike.
Cardboard also supports a sustainable studio practice. Many artists today want to reduce their carbon footprint. Using recycled boxes helps this goal. It gives a second life to paper waste. Beyond its green benefits, cardboard is very flexible. You can cut it with a simple craft knife. You can glue pieces on top of each other to add height. This is known as a collagraph relief. This mix of cutting away and adding on makes the process very fluid. It allows for quick changes during the design phase. It is a material that rewards curiosity and play.
Essential Materials and Tools
Selecting the Right Cardboard
Not all cardboard is the same. For high-quality prints, you must choose the right type. Thin cereal boxes are great for fine lines. They are dense and smooth. They do not have a wavy middle. This makes them easy to cut. Corrugated cardboard is better for bold textures. You should look for clean, dry pieces. Avoid cardboard with heavy wax coatings. Ink will not stick to wax. The best cardboard for printing has a matte finish. This allows the ink to sit evenly on the surface. You should also check for any dents. Dents will show up as white spots in your final print. Picking good stock is the first step to a clear image.
Cutting and Inking Tools
You will need a few key tools to work. A sharp craft knife or a utility knife is best for cutting. Always keep spare blades near you. A dull blade will tear the paper fibers. For inking, you need a brayer. A brayer is a small roller. It helps you apply a thin, even layer of ink. You also need water-based or oil-based block printing ink. Water-based ink is easier to clean. Oil-based ink often gives a richer color. You will also need a flat surface to roll out your ink. A piece of glass or a plastic tray works well. Lastly, gather your paper. Cardboard printing works well on many types of paper. Lightweight papers often pick up more detail from the plate.
Designing the Repeat Pattern
The Concept of the Tile
A repeat pattern starts with a single unit. We call this unit a tile. The goal is to make a tile that fits with itself. When you print it many times, the edges should meet. This creates a seamless look. Before you cut your cardboard, you must plan this tile. You can use a square or a rectangle. Think about how the lines on the left side will match the lines on the right side. This is the key to rhythm in art. Rhythm helps the eye move across the page. A good repeat pattern can hide where one print ends and the next begins. This creates a sense of infinite design.
Types of Repeat Systems
There are several ways to arrange your tiles. The most basic is the straight repeat. In this system, you line up the tiles in a simple grid. The rows and columns are straight. This is a very clean and formal look. Another popular choice is the half-drop repeat. In this style, you shift each column down by half the height of the tile. This breaks up the grid. It makes the pattern look more organic and complex. You can also try a brick repeat. This is like a half-drop but the shift happens in the rows. Using these systems adds a professional touch to your work. It shows a deep understanding of spatial design.
Building the Cardboard Matrix
Carving and Peeling Techniques
Once you have a design, you must move it to the cardboard. You can draw directly on the surface with a pencil. To create a relief, you must decide which parts stay high. If you want a line to be white, you must cut it out. If you want a line to be black, you leave it alone. To reveal the texture of the cardboard, use your knife to score the top layer. Then, gently peel it back. This shows the wavy interior. These lines will print as a series of stripes. This adds a rich, mechanical feel to the art. Be careful not to cut too deep. You only want to remove the top skin. Keeping the base strong is important for printing multiple times.
Sealing the Surface
Cardboard is porous. This means it soaks up liquid. If you apply ink to raw cardboard, the ink will vanish into the fibers. This makes the print look dull. To fix this, you should seal your plate. A thin layer of shellac or varnish works best. You can also use a mix of white glue and water. Apply this to the top of your cardboard matrix. Let it dry completely. This creates a hard shell. Now, the ink will sit on top of the plate. It will not soak in. Sealing also makes the plate last longer. You can wipe it clean and use it for many print runs. This is a vital step for professional results.
The Printing and Registration Process
Inking the Plate
Place a small amount of ink on your tray. Use the brayer to roll it out. You should hear a soft “hiss” sound. This means the ink layer is the right thickness. If the ink is too thick, it will fill in your fine lines. If it is too thin, the print will be faint. Roll the brayer over your cardboard plate. Move in different directions. This ensures every high spot is covered. The plate should look shiny and even. If you see spots without ink, roll it again. Consistency is key when making repeat patterns. Every tile in the pattern should have the same amount of ink.
Registration and Pressure
Registration is the act of lining up your prints. This is very important for repeat patterns. You can use a ruler to mark a grid on your paper. This shows you exactly where to place the plate. Place the inked plate face down on the paper. Use your hands or a clean brayer to apply pressure. You can also use a baren. A baren is a flat tool used to rub the back of the paper. Apply firm, circular pressure. Make sure you hit the corners and the center. Carefully lift the plate to see your image. To continue the pattern, re-ink the plate and place it in the next spot on your grid. Repeat this until the page is full.
Conclusion and Academic Summary
Cardboard relief printing is a powerful method for modern artists. it proves that high-quality art does not require expensive tools. By using the layers of the cardboard, you can create unique textures. Mastering the repeat pattern adds another layer of skill. It requires careful planning and a good eye for geometry. This process teaches us about the relationship between the single unit and the whole design. It also highlights the value of sustainable materials in the studio. Whether you are a student or a pro, this method offers endless room for growth. It turns simple cardboard into a sophisticated medium for expression. The results are both tactile and visually striking.
Sources
Grabowski, B., & Fick, B. (2009). Printmaking: A Complete Guide to Materials & Processes. Laurence King Publishing.
Ross, J., Romano, C., & Ross, T. (1990). The Complete Printmaker: Techniques, Traditions, Innovations. Free Press.
Westley, A. (2001). Relief Printmaking. Watson-Guptill Publications.
Woods, G. (1994). The Art of Relief Printing. Guild of Master Craftsman Publications.